Security Auditd
 (°0°)
(°0°)
The auditd subsystem is an access monitoring and accounting for Linux developed and maintained by RedHat. It was designed to integrate pretty tightly with the kernel and watch for interesting system calls. Additionally, likely because of this level of integration and detailed logging, it is used as the logger for SELinux.
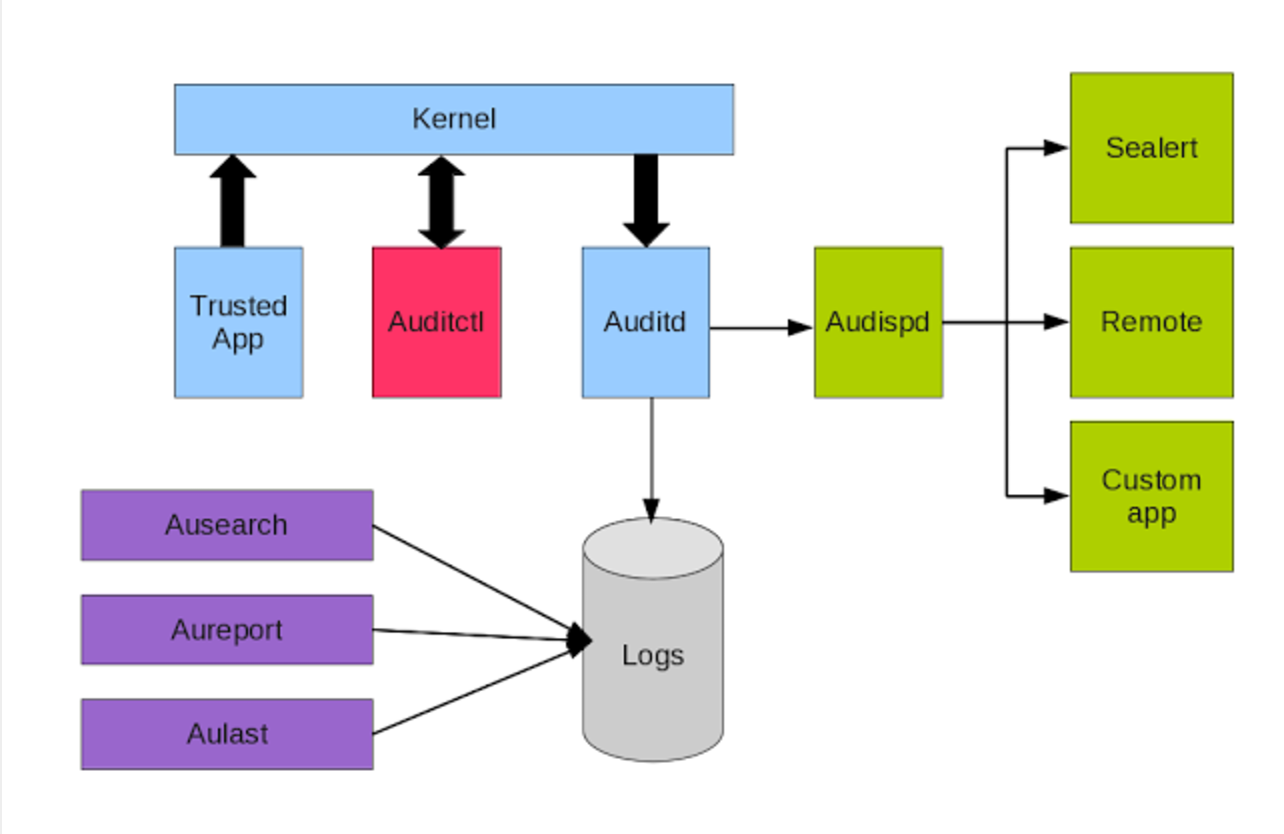
First let me explain the colors. Light blue are the things that create the events, purple is the reporting tools, red is the controller, gray is the logs, and green is the real-time components.
Audit events can be created in two ways. There are applications that send events any time something specific happens. For example, if you log in to sshd, it will send a series of events as the log in proceeds. It is considered a trusted application and it always tries to send events. If the audit system is not enabled, the event is discarded. Otherwise the kernel accepts the event, time stamps it, adds sender information to the event, and queues it for delivery to the audit daemon, auditd. The only job that the audit daemon has is to reliably dequeue and write events to the log and the event dispatcher, audispd.
The other way that events are created is by the kernel observing system activity that matches a rule loaded by auditctl. The kernel is the thing that creates most events…assuming you loaded rules. It uses a first matching rule system to decide if a syscall is of any interest.
OSsec
 (°0°)
(°0°)
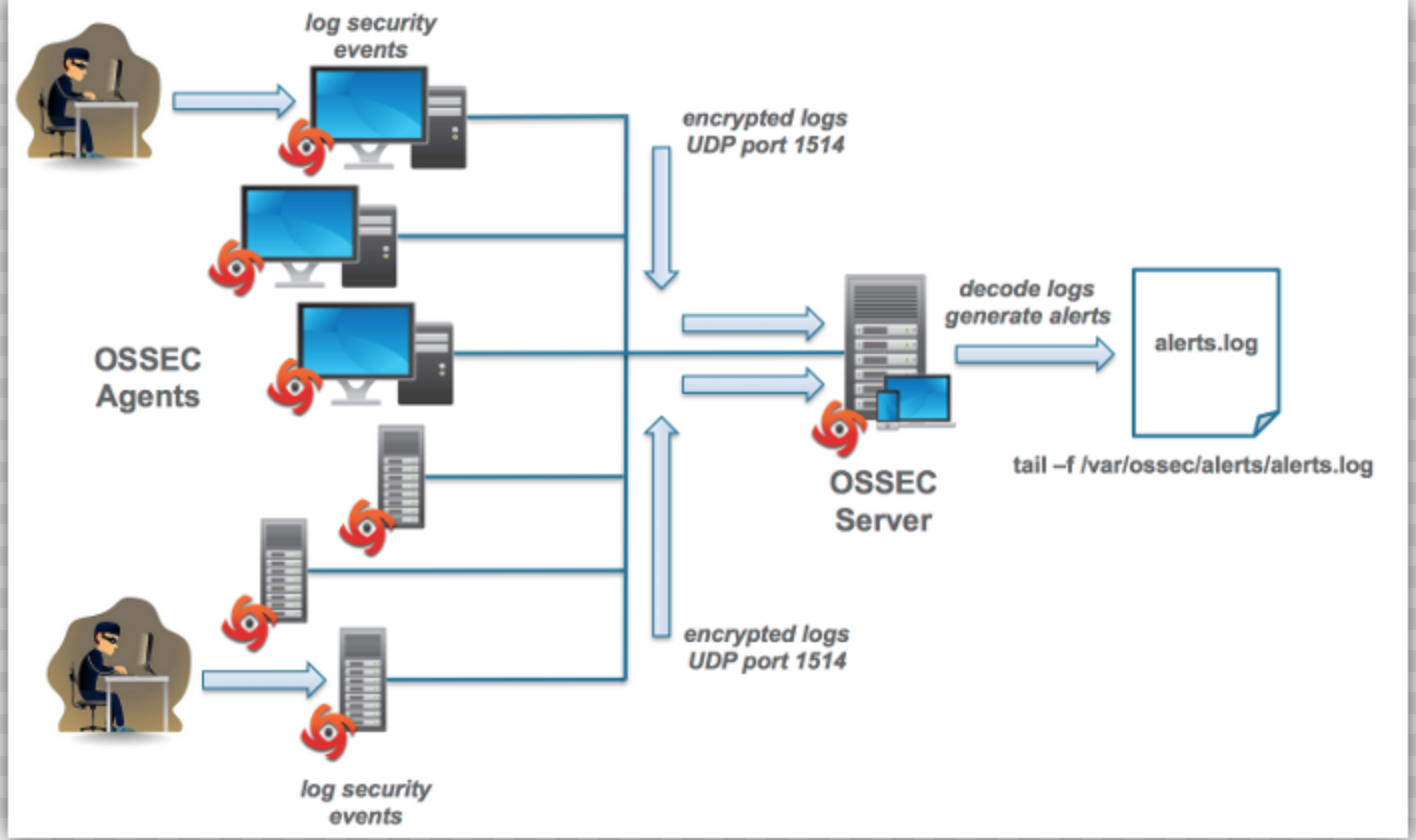
OSSEC is an Open Source Host-based Intrusion Detection System. It performs log analysis, integrity checking, Windows registry monitoring, rootkit detection, real-time alerting and active response.
SSL/TLS
refer
TLS is the successor of SSL.
SSL 2.0
SSL 3.0
TLS 1.0 (SSL 3.1)
TLS 1.1 (SSL 3.2)
TLS 1.2 (SSL 3.3)
 (°0°)
(°0°)
 (°0°)
(°0°)
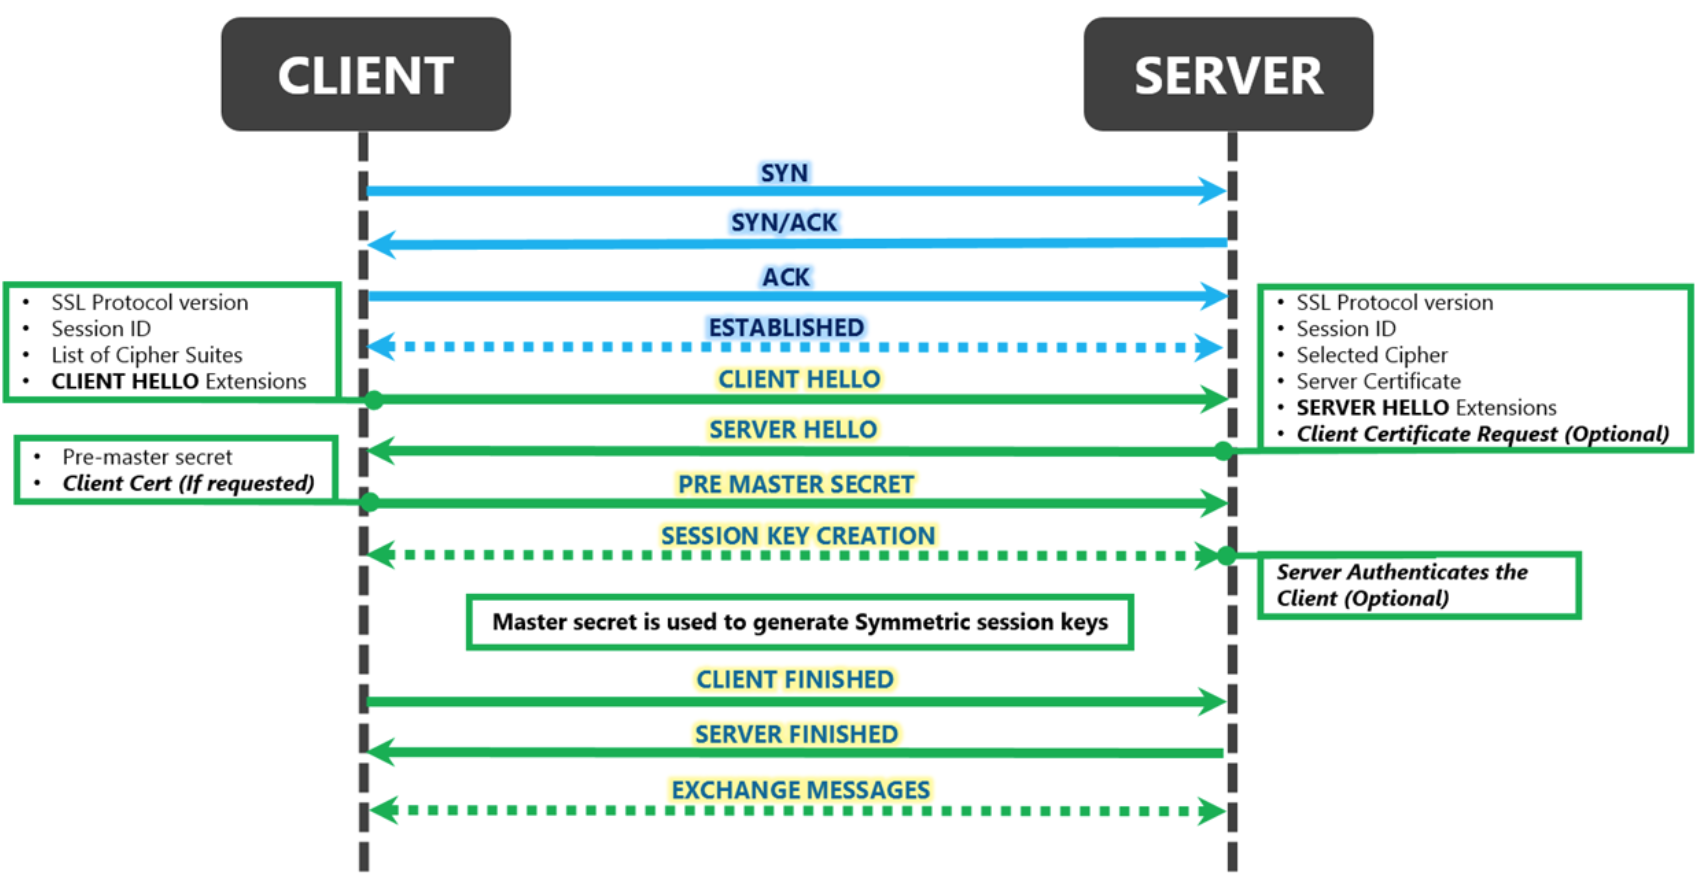
- Client will try to resolve the hostname to an IPAddress via DNS.
- Once the client has the Destination IP, it will send a TCP SYN to the server.
- The Server responds with ACK to this SYN.
- The client responds with an ACK to the ACK it received from the server. Now a TCP connection has been established between the client and the server. The client will now forward the requests to the Destination IP on port 443 (Default TLS/SSL port)
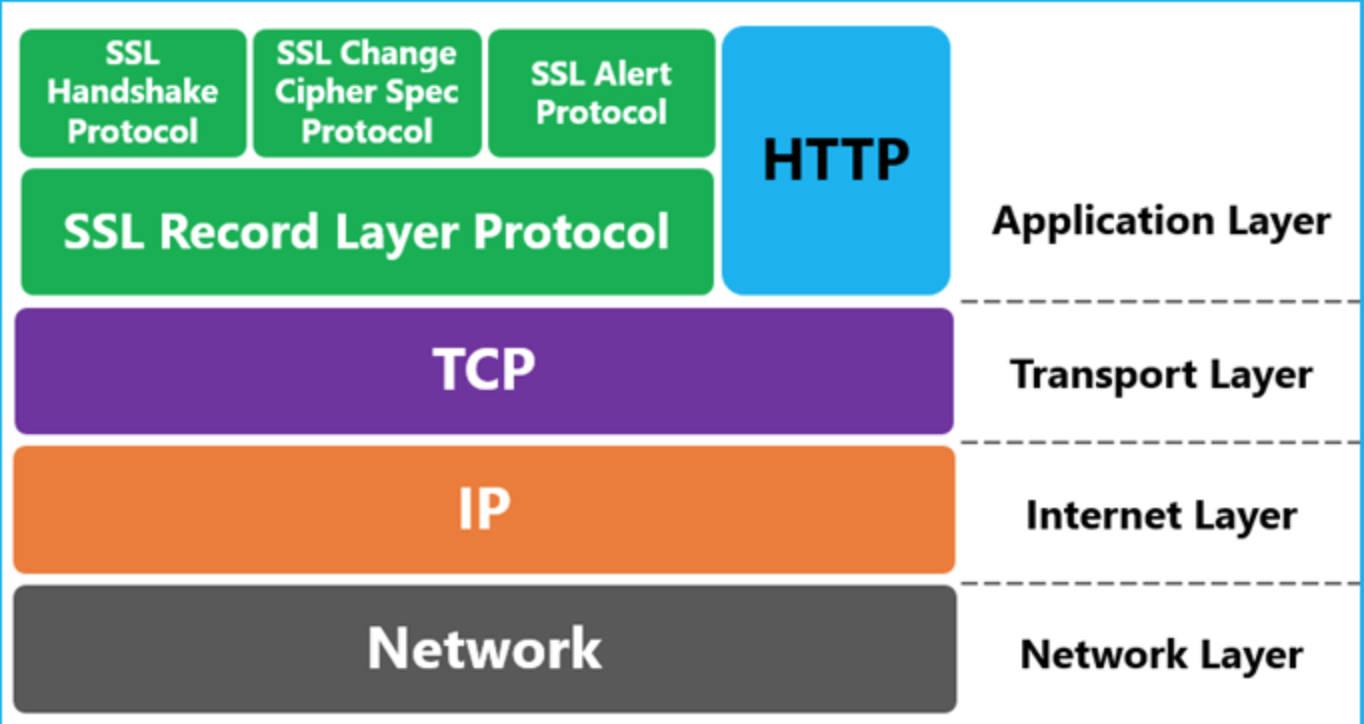
- The control is now transferred to the SSL Protocol in the application layer. It has the IP & the Port information handy from previous steps. However, it still has no clue whatsoever about the hostname.
- The client creates a TLS Packet called as CLIENT HELLO. This contains the following details:
SSL Protocol version
Session ID
List of Cipher Suites supported by the client.
List of CLIENT HELLO Extensions - The client sends a CLIENT HELLO to the server on the IP & Port it obtained during TCP handshake.
- The client sends a CLIENT HELLO to the server on the IP & Port it obtained during TCP handshake.
For this scenario I will consider IIS 7.5 as the SERVER entity. Upon receiving the CLIENT HELLO, the server has access to the following information:
IP Address (10.168.3.213)
Port Number (443)
Protocol Version (TLS 1.0)
List of Cipher Suites
Session ID
List of CLIENT HELLO Extensions etc.
The Server will first check if it supports the above protocol version and if any of the cipher suites in the provided list. If not, the handshake fails there itself. - The Server typically responds back with the following details:
SSL/TLS Protocol version.
One of the cipher suites from the list of cipher suites provided by client. (whichever is the most secure)
Certificate of the server (Without the private key of course)
List of SERVER HELLO Extensions.
(OPTIONAL)If the web app associated with this binding requires a Client Certificate for authentication then it would request the client to send the certificate. Here the IIS Sever would send the client the distinguished names of the list of TRUSTED ROOT CA it supports. - The Client uses the SERVER HELLO to perform SERVER AUTHENTICATION. If the server cannot be authenticated, the user is warned and informed that an encrypted and authenticated connection cannot be established. If the server is successfully authenticated, the client proceeds to the next step.
- The Client uses the data provided from the server to generate a pre-master secret for the session, encrypts it with the server’s public key (obtained from the server’s certificate), and then sends the encrypted pre-master secret to the server. If the server had requested for CLIENT CERTIFICATE, then client also signs another piece of data that is unique to this handshake and known by both the client and server. In this case, the client sends both the signed data and the client’s own certificate to the server along with the encrypted pre-master secret.
- If the server had requested for client authentication, the server attempts to authenticate the client. If the client cannot be authenticated, the session ends. If the client is successfully authenticated, the server uses its private key to decrypt the pre-master secret, and then performs a series of steps (which the client also performs, starting from the same pre-master secret) to generate the master secret.
- Both the client and the server use the master secret to generate the session keys, which are symmetric keys used to encrypt and decrypt information exchanged during the SSL session and to verify its integrity (that is, to detect any changes in the data between the time it was sent and the time it is received over the SSL connection).
- The CLIENT & the SERVER send each other a message informing that future messages from them will be encrypted with the session key. It then sends a separate (encrypted) message indicating that its portion of the handshake is finished.
- The SSL Handshake is done. The Client and the Server send each other messages which are encrypted/decrypted using the session keys generated in the previous step.
- It is now that the Client sends the actual HTTP Request packet to the Server in the encrypted form.
- The Server decrypts the request via the symmetric key and generates a response, encrypts it and sends it back to the client.
- This continues normally for the entire session of secure communication. However, at any time either the client or the server may renegotiate the connection. In this case the process repeats again.
[cryptographic security protocols:ssl and tls refer](https://www.ibm.com/support/knowledgecenter/en/SSFKSJ_7.5.0/com.ibm.mq.sec.doc/q009910.htm)
LADP
LDAP directory service is based on a client/server model. One or more LDAP servers contain the data making up the LDAP directory tree. An LDAP client application connects to an LDAP server using LDAP APIs and asks it a question. The server responds with the answer, or with a pointer to where the application can get more information (typically, another LDAP server). With a properly constructed namespace, no matter which LDAP server an application connects to, it sees the same view of the directory; a name presented to one LDAP server references the same entry it would at another LDAP server. This is an important feature of a global directory service, which LDAP servers can provide.
file:/etc/sssd/sssd.conf
slapd:
ldapsearch -x -h ldap (http://ldap) -D “uid=ldap_account,ou=people,dc=xxx,dc=xxx,dc=com” -b “ou=people,dc=xxx,dc=xxx,dc=com” -W -ZZ -s sub “uid=ldap_account”
File permission
SUID(4):SUID stands for Set User ID. This means that If SUID bit is set on a file and a user executed it. The process will have the same rights as the owner of the file being executed.
SGID(2):SGID stands for Set Group ID. The process will have the same group rights of the file being executed. If SGID bit is set on any directory, all subdirectories and files created inside will get same group ownership as the main directory, it doesn’t matter who is creating.
SBIT(1): The sticky bit is used to indicate special permissions for files and directories. If a directory with sticky bit enabled will restrict deletion of the file inside it. It can be removed by root, owner of the file or who have to write permission on it. This is useful for publically accessible directories like /tmp.
encrypt-gpg
mysqldump –all-databases | gpg –encrypt -r root